Falls are not random accidents; they are usually the result of small deficits that add up—stiffer ankles, slower foot placement, or a lapse in attention. The good news is that balance improves quickly with short, focused practice. This guide shows you how to test your starting point, build stability from static stances to reactive steps, and set up safe progressions you can do at home in minutes a day. You will learn how vision, inner-ear function, and joint position sense work together, and how to train each system without pounding your joints. If you want the broader context for why strength and aerobic capacity underpin stable movement, see our pillar on fitness for longevity. Use these drills to move with confidence—inside your home, on stairs and curbs, and across the uneven, unpredictable surfaces of real life.
Table of Contents
- Self-Checks: Single-Leg Stand, Tandem Walk, and Reach Tests
- Static to Dynamic Balance: Stance Progressions and Step-Overs
- Perturbation and Reactive Balance: Safe Challenges at Home
- Vision, Vestibular, and Proprioception: Training the Systems
- Environmental Safety: Lighting, Footwear, and Home Layout
- Programming: 5–10 Minutes Daily With Weekly Progressions
- When to Seek Professional Assessment
Self-Checks: Single-Leg Stand, Tandem Walk, and Reach Tests
Before you train balance, learn where you stand. Short, safe self-checks tell you which drills to prioritize and help you notice progress. Use a stable counter or chair nearby for safety. Record results in a notebook so you can track change over time.
1) Single-Leg Stand (eyes open/closed)
- Setup: Stand tall near a counter. Lift one foot an inch off the floor.
- Goal ranges:
- Eyes open: aim for 20–30 seconds without leaning or flailing arms.
- Eyes closed: aim for 5–10 seconds; this exposes ankle and hip control without visual help.
- What to watch: Hips level, knee soft, toes relaxed. If the stance leg wobbles or the pelvis drops, that signals hip and ankle stability to train.
2) Tandem Stand and Tandem Walk (heel-to-toe)
- Tandem stand: Place one foot directly in front of the other, heel touching toe, arms at sides. Hold 10–30 seconds per side.
- Tandem walk: Walk 10 steps along an imaginary line, heel-to-toe.
- What to watch: Head tall, eyes forward, quiet hips. Frequent toe catches or stepping off the line suggest you need more midline control and ankle strategy practice.
3) Functional Reach (forward reach without stepping)
- Setup: Stand side-on to a wall, arm forward at shoulder height, fist closed. Mark your start knuckle, then reach forward as far as possible without stepping or losing balance.
- Goal range: 20–25 cm (8–10 inches) or more suggests good anticipatory balance. Less reach often reflects stiff ankles or cautious postural control.
4) 30-Second Sit-to-Stand (context for leg strength)
- Setup: Sit on a firm chair without using your hands. Stand up and sit down as many times as possible in 30 seconds.
- Goal ranges: ≥12 reps for most healthy older adults; <10 means you should emphasize hip and thigh strength alongside balance work.
5) Lateral Step and “Stick” Check
- Setup: From a narrow stance, step sideways one foot-length and stick the landing for 2 seconds.
- Goal: 5 clean reps per side at a comfortable speed. Knee collapsing inward or repeated hops to regain balance indicates you should train lateral control.
Interpreting your results
- If single-leg times are asymmetric by >5 seconds, spend extra sets on the weaker side.
- If eyes-closed balance is very poor (<3 seconds), start with wider stances and ankle mobility/control drills before single-leg work.
- If the sit-to-stand is low, pair balance training with 2–3 strength exercises (chair stands, step-ups, light hinges) on non-consecutive days.
Safety notes for testing
- Always test near a support. Stop if you feel dizzy, experience sharp pain, or cannot hold posture. Retest every 2–4 weeks to confirm progress and adjust your plan.
These self-checks are not pass/fail exams. They simply show you what to train next: ankle strategy (small corrective motions at the foot), hip strategy (faster corrections with the trunk and hips), or stepping strategy (quick, controlled steps when needed). Start where you are; clean reps today reduce surprises tomorrow.
Static to Dynamic Balance: Stance Progressions and Step-Overs
Balance improves fastest when you progress positions from stable to challenging while protecting joints. Think of a ladder: wide stance → narrow stance → split stance → tandem → single-leg. Master each rung for short sets with perfect form before climbing.
The stance ladder (2–3 sets per rung)
- Hip-width stance, eyes forward (30–45 seconds): soften knees, stack ribs over pelvis, feel even pressure across the whole foot.
- Narrow stance, arms at sides (20–40 seconds): bring feet together; keep breathing steady.
- Split stance (20–30 seconds each side): one foot forward, heel down on the back foot, pelvis square.
- Tandem stance (15–30 seconds each side): heel-to-toe line. If you sway, widen the line slightly, then narrow over time.
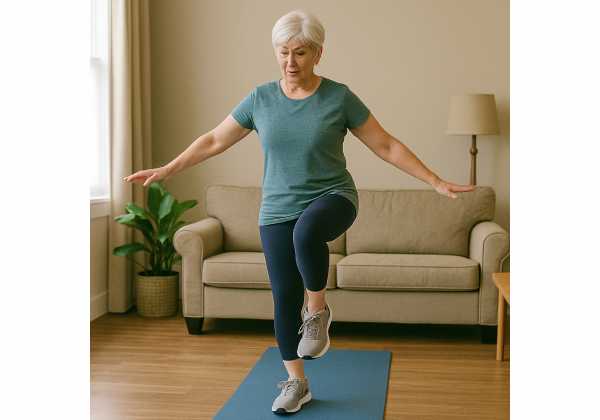
- Single-leg stance (10–30 seconds): raise the free knee slightly; think “tall and soft.” Touch a counter with a fingertip if needed and reduce contact as you improve.
Dynamic transitions (controlled movement over stable shapes)
- Weight shifts: From hip-width stance, shift onto one leg for 2 seconds, then the other—10 reps.
- Heel–toe rocks: Roll from heels to toes with small amplitude—10–12 reps.
- Quarter turns: From narrow stance, rotate 90° slowly and hold, then rotate back—4 reps each way.
- Step-overs: Place a small object (rolled towel). Step over and stick the landing for 2 seconds. Progress to diagonal step-overs and backward step-overs.
- Slow marching: Lift one knee to a comfortable height, hold 1 second, lower; 10 reps per side.
From static to stepping strategies
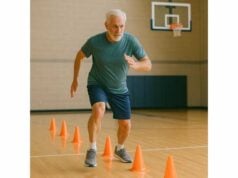
- Lateral reach-and-return: Tap a cone to your side with your toe and return—8–10 reps per side.
- Forward plant-and-hold: Step forward, land softly under your center, and hold 2 seconds—8 reps.
- Box pattern (small square): Step to each corner of a small square drawn with tape: forward, side, back, side—repeat both directions.
Coaching cues that solve 80% of problems
- Tall spine: imagine a string lifting the crown of your head.
- Soft knees, quiet feet: avoid locking joints or stomping.
- Slow is smooth: reduce speed until you can hold positions without wobbling, then add complexity.
A note on mobility and joint comfort
Stiff ankles make balance harder. Add ankle rocks (knee over toes, heel down) and calf raises with slow lower (3 seconds down, 8–12 reps) outside balance sessions. If knees or hips feel sensitive, reduce stance width changes and favor split stance positions that share load.
For warm, cooperative joints before balance work, a brief prep from our joint-friendly warm-up sequence pairs well with these drills.
Perturbation and Reactive Balance: Safe Challenges at Home
Real life is not predictable. A pet changes direction, a bus lurches, a rug edge catches your toe. Training perturbation (unexpected disturbances) and reactive steps prepares you to recover quickly when something surprises you. Keep intensity modest, set up safe surroundings, and prioritize quick accuracy over speed.
Simple, safe perturbations
- Band pulls at the waist: Loop a light resistance band around your hips, the other end anchored by a partner or sturdy point. Stand in hip-width stance; the partner gives brief tugs in different directions. Your task: resist and return to center without stepping if possible. 6–10 pulls total, rest, then repeat.
- Towel tugs: Stand holding a towel while a partner gives small, sudden tugs. Keep elbows soft; respond with a quick ankle/hip adjustment.
- Single-arm load shifts: Hold a light weight in one hand and shift it slightly while maintaining a tall posture; switch sides. This trains anti-rotation control.
Reactive stepping drills
- Choice step from center: Place markers front, back, left, and right. A partner calls a direction (or uses colored cards). Step and stick the landing, then return to center. Start with 10 cues; progress to 12–16 as clean reps increase.
- Clock steps: Imagine numbers around you. A partner calls “3,” “6,” or “9,” and you step to that “hour,” then return.
- Bump-and-step: With a partner’s gentle hip tap, step naturally in the direction of the nudge and stabilize for 2 seconds.
Unpredictability without chaos
- Keep sets short: 20–40 seconds with equal or longer rest.
- Use soft surfaces only if traction is reliable; avoid pillows or squishy mats that hide foot placement.
- Build from one direction to two options to three or four options. When errors exceed ~15% in a set, regress the complexity.
Integrating vision and attention
- Add a callout layer—colors, numbers, or simple arithmetic—while stepping to simulate everyday distractions.
- Use eye–head coordination: partner shows a colored card at shoulder height; you turn your eyes first, then head, then step.
Lateral control matters most
Many falls occur sideways. Emphasize lateral plant-and-hold and side-step stick drills. Keep the plant foot under your hip and knee aligned over mid-foot. If the knee caves inward, narrow the step and slow the tempo.
If you want extra quickness with low joint stress, pair these with playful, low-amplitude power drills from our low-impact plyometrics guide—tiny line hops or pogo steps for 5–8 seconds with long rests.
Vision, Vestibular, and Proprioception: Training the Systems
Balance relies on three systems working together: vision (what you see), vestibular (inner-ear sensors for head motion and position), and proprioception (joint and soft-tissue sensing). Training one system while lightly challenging the others makes your balance more robust in real-world conditions.
Vision: sharpen, then reduce dependence
- Gaze stabilization (VOR x1): Hold a letter card at arm’s length. Keep the letter clear while you move your head side-to-side at a comfortable speed for 20–30 seconds. Repeat up–down.
- Target switching: Place two letters on the wall; move eyes (not head) between them quickly for 20 seconds, then add small head turns.
- Eyes-narrowed stance: In a safe stance (split or tandem near a counter), partially close eyelids or dim the lights slightly to reduce visual certainty—but keep it safe.
Vestibular: tolerate head movement during stance
- Head turns in narrow stance: From feet-together position, rotate head left–right slowly for 20 seconds, then nod up–down.
- Quarter turns with gaze anchor: Fix your eyes on a spot at eye level; rotate your body 90°, then back, keeping the spot in view.
- March with head turns: Slow marching while turning the head every third step; keep the torso stable.
Proprioception: improve joint awareness
- Ankle alphabet: Draw the alphabet in the air with your toes, slow and controlled—once per foot.
- Barefoot weight shifts: On a firm surface, shift pressure from the ball to the heel and across the forefoot, sensing the tripod of the foot (big toe base, little toe base, heel).
- Single-leg “air reach”: In single-leg stance, reach the free foot to tap forward, side, and back without touching down; 3–5 taps each direction.
Layering the systems
- Combine VOR x1 with tandem stance to challenge eyes and inner ears while your feet stabilize.
- Pair eyes-narrowed with lateral step-and-stick to build confidence when vision is uncertain (dim restaurants, night lighting).
- Add soft auditory cues (partner says “left,” “right,” “back”) while you hold a stance—light dual-tasking that mirrors real life.
Progress rules
- Change one variable at a time (stance width, head motion, or visual input).
- Keep dizziness as a stop signal. If symptoms linger beyond a minute, rest and regress the drill.
- Favor quality over duration: clean 20-second sets beat sloppy 60s holds.
For posture and trunk control that help every drill above feel more stable, skim our primer on anti-extension and anti-rotation core work and sprinkle a set or two after balance sessions.
Environmental Safety: Lighting, Footwear, and Home Layout
The environment is either an ally or a trap. Small changes to lighting, footwear, and layout reduce risk immediately while your training builds capacity.
Lighting that prevents surprises
- Night pathways: motion-activated nightlights from bed to bathroom and kitchen.
- Task lighting: brighter bulbs over stairs, worktops, and entryways; avoid glare and deep shadows.
- Outdoor checks: ensure porches and steps are evenly lit; consider contrasting tape on stair edges.
Footwear that grips and guides
- Indoors: choose thin, grippy soles that bend at the forefoot; avoid fluffy slippers with smooth bottoms.
- Outdoors: shoes with firm heel counters and tread that channels water away; replace worn soles.
- Socks: if you prefer socks indoors, use non-slip grips.
Home layout that favors flow
- Clear the line of travel: keep walkways at least shoulder width; coil cords, remove small rugs, or secure them with non-slip backing.
- Declutter corners and thresholds: baskets for shoes, hooks for bags, and organizers for cables.
- Height and reach: place frequently used items between hip and shoulder level; avoid step-stool dependence.
Stairs and transitions
- Handrails on both sides where possible.
- Contrasting edges on the first and last steps.
- Slow the first step: pause, check footing, then go—especially when carrying items.
Bathroom and kitchen safety
- Grab bars near toilet and shower; non-slip mats where water collects.
- Stable stools or chairs for food prep if standing tolerance is limited; never lean on rolling chairs.
Pets and people
- Train pets to sit before doorways and feeding; add a bell to collars for awareness.
- Ask family to avoid leaving bags or laundry on floors and stairs.
Out-and-about habit
- Scan two steps ahead, not at your feet.
- On uneven ground, shorten stride and maintain a slight knee bend.
- If visibility or traction is poor, default to side-stepping with a wider base.
When you are ready to explore outdoor conditioning that respects terrain while building endurance, our field guide to hills and stairs helps you scale challenge without sacrificing safety.
Programming: 5–10 Minutes Daily With Weekly Progressions
Balance responds best to small, frequent practice. Five to ten minutes per day is enough when you focus on quality and keep the plan simple. Use a repeatable template, then make small upgrades each week.
Daily micro-session (5–10 minutes)
- Stance block (2 minutes): pick one rung of the stance ladder (e.g., tandem or single-leg). 2 sets of 20–30 seconds per side.
- Dynamic block (2–3 minutes): step-overs, lateral reach-and-return, or box pattern—2 sets of 8–10 reps each.
- Reactive block (1–2 minutes): choice step from center or clock steps—10–12 cues total.
- System layer (1–2 minutes): add gaze stabilization or head turns to your chosen stance.
- Strength sprinkle (optional, 1–2 minutes): 1 set of 8–12 chair stands or step-ups.
A four-week progression
- Week 1: hip-width and narrow stances; step-overs; basic choice step (two options).
- Week 2: split and tandem stances; box pattern; clock steps.
- Week 3: single-leg stance (with fingertip support as needed); diagonal step-overs; add head turns.
- Week 4: mix of tandem and single-leg; reactive steps with three or four options; brief low-amplitude lateral “quick steps.”
Weekly checkpoints
- Retest single-leg time and tandem walk every 2 weeks.
- Aim to add 3–5 seconds to holds or reduce errors on choice steps while keeping movements quiet and controlled.
Where to place balance in your week
- Before walks or strength sessions as a neural warm-up.
- After dinner when you tend to be indoors and shoes are off—short, barefoot sets build foot awareness.
- If legs feel heavy, prioritize stance and gaze work; skip reactive drills that day.
When to deload
- If joints feel achy for a week and accuracy drops, cut volume 40–60% for 5–7 days but keep brief rehearsal (single holds, easy step-overs). Resume with a two- or three-day ramp.
For structured strength that complements balance, borrow a simple split from our weekly strength plan, and use clear set and tempo targets from session design basics to avoid fatigue spikes that undermine stability.
When to Seek Professional Assessment
Self-directed training covers most needs, but there are times when a professional assessment improves safety and speed of progress. Seek a physical therapist, sports medicine clinician, or vestibular specialist if any of the following apply.
Red flags (stop and consult)
- Unexplained dizziness, spinning sensations (vertigo), or fainting episodes.
- Sudden vision changes or double vision.
- New numbness, weakness, or foot drop.
- Frequent falls (two or more in a year) or falls with injury.
- Marked asymmetry (e.g., single-leg stand differs by >10 seconds) that does not improve after 4–6 weeks of practice.
- Rapid decline in balance or gait without a clear cause.
Post-injury or post-illness return
- After ankle sprains, knee surgeries, or prolonged illness, get a tailored ramp that begins with range and control, then stance ladder, then reactive steps. A clinician can also screen for lingering proprioceptive gaps and prescribe targeted drills.
Medication and medical conditions
- Some medications (for blood pressure, sleep, or mood) can cause lightheadedness or delayed reactions. A clinician can time sessions around dosing or advise on hydration and position changes.
- Neuropathy, Parkinsonian symptoms, or vestibular disorders often benefit from specific protocols and safety adjustments.
Home safety walkthrough
- If you have tripping hazards, stairs without rails, or poor lighting, consider a brief home safety evaluation. Small changes—grab bars, contrast tape, nightlights—lower risk immediately while you train capacity.
Assistive devices
- A cane or walking stick, used correctly, may be a bridge, not a permanent status. The right device and height can reduce falls during training cycles. Professionals ensure fit and teach safe use on stairs and in crowds.
Setting expectations
- Improvements often appear within 2–4 weeks for stance and stepping drills, and 4–8 weeks for more reactive control. If progress stalls despite consistent practice, testing can reveal whether vision, vestibular input, or strength is the rate-limiting factor.
Remember: asking for help is not a setback; it is a tactic. Well-timed guidance reduces risk and accelerates the return to confident, enjoyable movement.
Disclaimer
This article provides general information for adults interested in improving balance and reducing fall risk. It is not a substitute for personalized medical advice, diagnosis, or treatment. Training plans should reflect your health status, medications, and prior injuries. Consult a qualified clinician—especially if you have dizziness, neuropathy, recent falls, or cardiovascular or neurological conditions—before starting or progressing a program.
If you found this guide useful, please consider sharing it with a friend or on your preferred social platform, and follow our work for future updates. Your support helps us continue producing practical, trustworthy content.

