A resilient core supports how you breathe, move, and carry load across decades. It does more than “tone abs.” Your trunk manages pressure, resists unwanted motion, and transfers force between hips and shoulders so walking, lifting, and recreational sport feel smooth and safe. This guide builds a practical core system for healthspan using two proven themes: anti-extension (resisting excessive arching) and anti-rotation/anti-lateral-flexion (resisting twist and side-bend). You’ll learn simple tests to track progress, staple drills that scale up or down, and weekly templates you can repeat. If you also care about aerobic fitness and strength—the other pillars that protect independence—see our primer on fitness for longevity fundamentals. Start with a few minutes most days, program small wins, and protect quality of life you can feel on stairs, in the garden, and during long days on your feet.
Table of Contents
- Core Roles: Breathing, Bracing, and Transfer of Force
- Anti-Extension Staples: Dead Bug, Hollow, and Plank Variations
- Anti-Rotation and Anti-Lateral Flexion: Pallof, Carries, and Side Planks
- Posture Breaks: Desk, Driving, and Daily Reset Drills
- Spine-Smart Cues for Lifts and Everyday Tasks
- Weekly Core Template: Short Sessions With Progressions
- When Soreness or Pain Signals a Form Fix
Core Roles: Breathing, Bracing, and Transfer of Force
Your core is pressure management plus movement control. Think of the trunk as a cylinder: diaphragm on top, pelvic floor on the bottom, abdominal wall and spinal muscles around. When you inhale, the diaphragm descends, pressure increases, and the system stabilizes the spine. When you brace, you stiffen the cylinder to transmit force—like passing power from glutes through the torso into a box you’re lifting.
Breathing sets the base. Many people try to brace by “sucking the belly in,” which reduces pressure and can actually make you feel less stable. A better sequence:
- Inhale quietly through the nose and let the ribcage expand 360°.
- Feel the lower ribs widen and the belly gently move forward.
- On the exertion, make a short, crisp exhale as if fogging a mirror; the abdominal wall firms without collapsing posture.
Bracing is context-specific. You don’t need a maximal brace to tie your shoes. Reserve stronger bracing for heavier tasks—picking up a suitcase, racking a barbell, or stepping off a curb with a backpack. In daily life, think “firm but breathable,” allowing the ribs to stay down and the pelvis neutral.
Transfer of force connects hips and shoulders. Most injuries and “tweaks” come from motion you didn’t intend—excessive arching during overhead reach, last-second twist while lifting laundry, or side-bending when carrying groceries. Training the trunk to resist those stray movements protects joints while preserving athletic options: gardening, pickleball, hiking, and playing with grandkids.
Anti-movements versus big ranges. You still want hips and shoulders to move freely, while the lumbar spine stays relatively quiet. Core training should prioritize resisting extension, rotation, and lateral flexion under load and at speed. That’s why you’ll see dead bugs, planks, Pallof presses, side planks, and loaded carries throughout this plan.
Aging considerations. With age, we see:
- Reduced rib mobility and diaphragm excursion in many adults.
- Habitual extended posture (flared ribs, tilted pelvis) that increases compressive stress.
- Slower force production and balance declines.
Good news: breathing drills plus anti-movement training help you restore pressure control, reduce cranky extension bias, and keep balance sharp. Paired with progressive walking and strength work, your core becomes a reliable “force bridge” for decades.
How to feel it today. Stand tall, soften the knees, and place thumbs on lower ribs, fingers on obliques. Inhale through the nose so your thumbs widen slightly. Say “sss” for 2–3 seconds; feel your fingers firm under the ribs. Keep length through the back of the neck. That light, even firmness—without breath-holding—is your everyday brace.
Anti-Extension Staples: Dead Bug, Hollow, and Plank Variations
Why anti-extension? Many adults live with a subtle anterior tilt and flared ribs: the low back overarches, hip flexors work overtime, and the neck compensates. Anti-extension drills retrain the abdominal wall to manage rib position and resist arching while limbs move. They also pair well with breathing so you can stabilize without breath-holding.
Dead bug—gold standard for control.
- Setup: Lie on your back, ribs heavy on the floor. Knees over hips, shins parallel, arms vertical.
- Action: Inhale through the nose; on a gentle “sss” exhale, reach one heel long to the floor as the opposite arm reaches overhead. Keep the low back lightly pressed down. Return and switch.
- Dosage: 3 sets of 5–8 controlled reps per side. Stop if your ribs pop up or you lose control.
- Progressions: Add a mini band around the feet; pause one second near the bottom; or extend both legs (only if you can keep rib contact).
Hollow variations—tension without strain.
- Hollow hold (beginner): Knees tucked, arms forward, shoulder blades just off the floor. Think “long spine, heavy ribs.”
- Hollow rock (intermediate): Keep the same shape and rock gently. Small amplitude; quality over motion.
- Contra-indicator: Skip if it triggers neck strain—return to dead bug or substitute plank.
Plank progressions—time and tension, not fatigue.
- Forearm plank: Elbows under shoulders, ribs low, glutes lightly squeezed, quads active. Maintain a quiet breath—inhale 3 seconds, exhale 3 seconds. 2–3 sets of 15–30 seconds with perfect form beat one sloppy minute.
- Long-lever plank: Move elbows an inch forward to increase anti-extension demand without changing load.
- Plank walk-backs: From a tall plank, slowly walk hands back under shoulders if they drift; “zipper” your ribs down as if fastening a jacket.
Coaching cues that work.
- “Exhale to set ribs; breathe into your low back.”
- “Long from crown to tail; imagine the floor gently pulling your elbows forward.”
- “Quiet midsection; moving limbs.”
Programming and pairing. Place anti-extension first in core sessions to set rib-pelvis position for everything else. Pair with hip-dominant moves (hinges, bridges) to reinforce neutral spine. For example:
- A1 Dead bug 6/side (3 sec exhale)
- A2 Hip bridge 8–10 (2 sec pause at top)
- A3 Forearm plank 20–30 seconds
Common pitfalls.
- Holding breath or pushing belly outward.
- Shrugging shoulders during planks.
- Chasing time over quality; form should look the same at second 5 and second 25.
Where to learn more. To refine pressurization and rib control, see our piece on diaphragm-led bracing for simple drills you can slot before any plank progression.
Anti-Rotation and Anti-Lateral Flexion: Pallof, Carries, and Side Planks
Life is asymmetrical. You carry bags on one side, step off curbs unevenly, and reach across your body all day. Training your trunk to resist twist (anti-rotation) and side-bend (anti-lateral flexion) builds the “buffer” that keeps backs and hips happy under surprise forces.
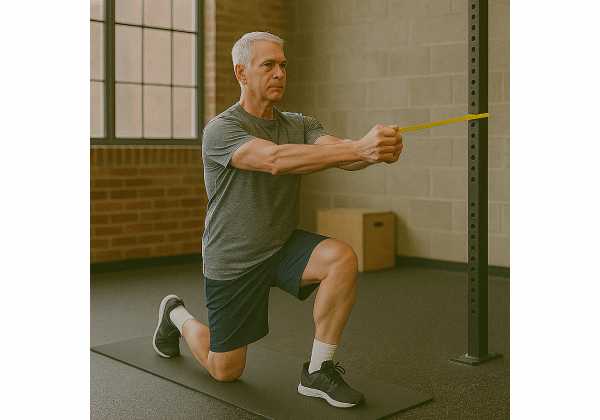
Pallof press—simple, scalable, effective.
- Setup: Stand side-on to a band/cable at belly-button height. Feet hip-width. Hands clasped at chest.
- Action: Exhale, press hands straight out; hold 1–2 seconds; inhale as you bring them back. Keep ribs down, belt line level, and no rotation.
- Progressions: Half-kneeling to reduce compensations; tall-kneeling for more trunk demand; standing with feet together; or a brief overhead reach at full extension.
- Time under tension: 3 sets of 6–10 smooth reps per side, or 15–25-second holds in the extended position.
Loaded carries—real-world resilience.
- Suitcase carry: One dumbbell or kettlebell in one hand, walk 15–30 meters. Stay tall, avoid side lean, walk quietly.
- Rack carry: Bell “racked” at the chest to increase anti-rotation challenge.
- Farmer carry: Bells in both hands—use to build grip and general stiffness before progressing to offset loading.
Side planks—lateral line strength.
- Beginner: Bent-knee side plank on forearm; lift hips and create a straight line from shoulder to knee.
- Standard: Legs straight, feet stacked. Hold 15–30 seconds with a tall chest and long neck.
- Progression: Top-leg marches, “star” position, or light band row with the top arm.
Programming examples.
- A1 Pallof press hold 20 seconds/side
- A2 Suitcase carry 2×20 meters (switch hands halfway)
- A3 Side plank 15–30 seconds/side
Technique yardsticks.
- If the band pulls you into rotation, reduce distance or tension.
- In carries, imagine a glass of water on your head—no sloshing.
- In side planks, keep the bottom ribcage lifted, not collapsed.
Why this matters with aging. Anti-rotation strength supports balance recovery when you catch a toe or turn quickly. It reduces strain during unilateral tasks—vacuuming, gardening, or pushing a heavy door. It protects the lumbar spine by asking hips and upper back to rotate while the midsection stays quiet.
Complementary reading. For hinge strategy and spine load management that pair perfectly with these drills, see spine-smart hinge patterns.
Posture Breaks: Desk, Driving, and Daily Reset Drills
Posture isn’t a statue; it’s a rhythm. Long static positions—at a desk, on a flight, or behind the wheel—aren’t “bad,” but staying still is. Plan micro-breaks every 30–45 minutes to restore rib movement, hip extension, and upper-back rotation. Two minutes is enough to bring your core back online.
Two-minute reset (no equipment).
- 360° Breathing (30 seconds): Seated or standing, one hand on low ribs, one on low belly. Inhale through the nose to expand the ribs sideways and back; long, quiet exhale through pursed lips.
- Wall Reach (30 seconds): Stand an arm’s length from a wall, feet under hips. Reach both hands forward at shoulder height and gently round the upper back without collapsing the neck. Keep ribs down; breathe.
- Hip Flexor Unwind (30 seconds/side): Half-kneeling lunge, tuck pelvis slightly (think zipper ribs to belt), shift forward until you feel the front of the hip. Light glute squeeze; slow breaths.
- T-Spine Opener (30 seconds): Hands behind head; exhale and rotate gently to one side, inhale back to center, then the other side.
Driving and flights.
- Adjust seat so hips are level with or slightly higher than knees.
- Use a small towel roll at the low ribs (not deep in the low back) to cue ribs down.
- Every fuel stop or aisle walk, perform 3 deep nasal breaths with a long exhale, then 10 calf raises and 5 hip hinges.
Desk setup that respects your core.
- Screen at eye level to reduce rib flare and neck extension.
- Chair allows feet flat and knees around 90°. If you use a standing desk, keep abs lightly engaged and avoid dumping into an arch.
- Keep frequently used items within forearm reach to reduce repetitive twisting.
Movement snacks that add up.
- 5 wall slides to open upper back.
- 10 sit-to-stands, slow on the way down.
- 20-second forearm plank with easy breathing.
When to stretch versus when to brace. If you feel “tight” across the low back, check first: are your ribs flared and belly pushing forward when you stand? A brief exhale and light brace can relieve perceived tightness by improving pressure, whereas aggressive lumbar stretching can irritate tissue.
Extra help. If your hips or shoulders often block good alignment, a short mobility primer helps anti-movement work stick. Try this targeted routine: hips, shoulders, and ankles reset—it pairs well with these micro-breaks.
Spine-Smart Cues for Lifts and Everyday Tasks
Make your brace automatic. The goal is to lift, carry, push, and pull with a calm midsection. Use these cues to embed anti-extension and anti-rotation principles into real life.
Universal setup (the 5-point check).
- Feet: Tripod pressure—big toe, little toe, heel.
- Knees: Soft, stacked above mid-foot.
- Hips: Hinge back to load glutes for lifts; for squats, sit between the hips without tail tuck.
- Ribs: Exhale to set them “down and wide,” not flared.
- Head: Long neck, chin slightly tucked.
Picking things up (laundry, suitcase, garden bags).
- Hinge, then grip. Slide hips back, keep shins nearly vertical, and maintain a long spine.
- Breathe, then move. Inhale to set; short exhale + firm brace as you stand.
- Don’t twist while loaded. Turn with small steps, then set the item down.
Carrying groceries or a toddler.
- Offset load: Hold heavier bag close to your side; spare hand pressed lightly to ribs cues neutral.
- Quiet pelvis: Walk as if balancing a book; avoid side sway.
Overhead tasks (top shelf, changing bulbs).
- Avoid rib flare: Exhale to set ribs, then reach overhead letting the shoulder blade rotate upward. If your low back arches, lower the load or switch to a step stool.
Gym lifts and machines.
- Deadlift: “Crack the walnut” with your armpits (lat engagement) before the bar leaves the floor. Feel pressure in the belly 360°, not just forwards.
- Presses and pulldowns: Keep ribs stacked over pelvis; exhale through the sticking point.
- Rotational cable work: Stand tall, keep hips pointed forward, and let the thoracic spine rotate while the pelvis stays quiet.
Common energy leaks.
- Breath-holding for light tasks—save strong bracing for heavy or awkward lifts.
- Rushing the setup—take one breath to organize ribs and pelvis first.
- Over-cuing the low back—focus on glutes and lats to create a “corset” without forcing lumbar extension.
Skill progression for everyday strength.
- Week 1–2: Hinge pattern + suitcase carries.
- Week 3–4: Add goblet squats + anti-rotation presses.
- Week 5–6: Introduce split-stance lifts and tall-kneeling presses to challenge control without heavy loads.
Related guide. For technique walk-throughs on squat, hinge, push, and pull, see technique fundamentals and apply the rib-pelvis stacking you’ve practiced.
Weekly Core Template: Short Sessions With Progressions
You don’t need long ab workouts. You need brief, consistent sessions that progress slowly and integrate with strength and cardio. Here’s a flexible template (10–15 minutes, three days per week) built around anti-extension and anti-rotation themes.
Session A – Foundations (Mon)
- Breathing Primer: 3 breaths (in 4–5 seconds / out 4–5 seconds) focusing on rib expansion.
- Dead Bug: 3×6/side with a 2-second pause near the end range.
- Forearm Plank: 3×20–30 seconds (nasal breathing).
- Suitcase Carry: 2×20–30 meters/side.
- Optional Mobility: 30 seconds/side half-kneeling hip flexor opener.
Session B – Lateral Line (Wed)
- Side Plank: 3×15–30 seconds/side (progress to top-leg marches).
- Pallof Press Hold: 3×15–25 seconds/side (choose tension that challenges without twisting).
- Hip Hinge + Band Row: 2×10 (hinge to set spine, row without rib flare).
- Rack Carry: 2×15–25 meters/side.
Session C – Integration (Fri)
- Tall-Kneeling Overhead Press (light): 3×6–8 focusing on ribs stacked over pelvis.
- Long-Lever Plank: 3×15–25 seconds.
- Pallof Press with Step-out: 2×6–8/side.
- Farmer Carry: 2×30–40 meters.
Progression rules (4-week blocks).
- Add time first: Increase holds by 5 seconds (up to ~30–40 seconds) before adding tension.
- Then add tension: Step farther from the anchor or choose a thicker band.
- Then add complexity: Change stance (half-kneeling → standing → feet together → split stance) or add a light movement (press-out step, top-leg march).
- Stop one rep shy of form loss. Quality beats volume. If breathing gets noisy or ribs pop, end the set.
How this fits with your week.
- Place core sessions after your main strength lifts or at the end of a Zone 2 walk/ride.
- If you’re short on time, do a 2-exercise finisher: dead bug + suitcase carry, or side plank + Pallof hold.
Deloads and recovery.
- Every 4th week, reduce total core volume by ~30–40% or hold times by ~10 seconds to consolidate gains.
- Soreness should stay mild. If you feel sharp pain or lingering back tightness the next day, scale back holds and revisit your rib-pelvis stack.
Session design resources. For sets, reps, tempo, and RPE frameworks that align with this template, see our article on simple session design.
When Soreness or Pain Signals a Form Fix
Expect gentle fatigue, not joint pain. A well-designed core plan produces a pleasant “worked” feeling in the abdominal wall and lateral hip, fading within 24–36 hours. Pain localized to the spine, pinching at the front of the hip, or persistent neck strain points to a form issue or an exercise that’s too advanced.
Red flags—pause and assess.
- Sharp or radiating pain into the leg or groin.
- Numbness, tingling, or loss of strength.
- Pain that spikes during or immediately after breathing or bracing.
Common causes and quick fixes.
- Low-back ache in planks: Hips sagging or ribs flaring. Shorten the hold to 10–15 seconds, exhale to set ribs, and elevate forearms on a bench to reduce leverage.
- Neck tension in hollow work: Lower your head to the floor and focus on rib contact; switch to dead bugs for two weeks before retrying.
- Hip pinch in dead bugs: Limit leg-lower range to the point just before the pinch, or bend the knee more to reduce hip flexor compression.
- Side plank shoulder strain: Stack the elbow directly under the shoulder and press the floor away; regress to bent-knee variation.
When to regress globally. If multiple drills trigger symptoms, cut total sets by half, pick the easiest stance options (half-kneeling Pallof, bent-knee side plank), and keep holds to 10–15 seconds. Build back slowly over 1–2 weeks.
When to get assessed. If pain persists beyond a week of modifications, if you notice night pain, unexplained weight loss, fever, or changes in bowel/bladder function, seek medical evaluation. Otherwise, a qualified physical therapist can assess movement, rib-pelvis mechanics, and breathing patterns to personalize your plan.
Mindset: progress, not perfect. The most useful habit is noticing early warning signs—breath getting choppy, ribs lifting, or pelvis drifting—and stopping one rep early. That single choice protects your spine, keeps training consistent, and moves you steadily toward a stronger, calmer core.
References
- Motor control exercise for chronic non-specific low-back pain 2016 (Systematic Review)
- A Systematic Review of the Effectiveness of Core Stability Exercises in Patients with Non-Specific Low Back Pain 2022 (Systematic Review; Free PMC)
- Effect of Body Position and Support Surface on the Postural Control Challenge During the Pallof Press Exercise: A Smartphone Accelerometer-Based Study 2025 (Study; Free PMC)
- Effect of Adding Diaphragmatic Breathing Exercises to Core Stabilization Exercises on Pain, Muscle Activity, Disability, and Sleep Quality in Patients With Chronic Low Back Pain: A Randomized Control Trial 2023 (RCT; Free PMC)
- Motor Control Stabilisation Exercise for Patients with Non-specific Low Back Pain: A Systematic Review and Meta-analysis 2020 (Systematic Review and Meta-analysis; Free PMC)
Disclaimer
This content is educational and is not a substitute for personalized medical advice, diagnosis, or treatment. Always consult a qualified healthcare professional before starting or changing an exercise program, especially if you have current pain, a medical condition, or recent surgery. If you experience sharp pain, numbness, or unexpected weakness during these drills, stop and seek professional guidance.
If you found this guide useful, please consider sharing it on Facebook, X (formerly Twitter), or your favorite platform, and follow us for future updates. Your support helps us continue creating practical, high-quality resources.

