Modern continuous glucose monitoring (CGM) lets you see how meals, exercise, sleep, and stress affect your glucose in real time—without constant finger-sticks. For people focused on healthy aging, CGM can highlight patterns that traditional labs miss, like late-evening surges or post-workout dips. This guide explains how CGMs work, what “good enough” accuracy looks like, when to trust the number on your screen, and how to turn streams of data into choices you’ll actually keep. If you’re just starting to assemble a personal longevity toolkit, consider browsing our broader resource on biomarkers and tools for long-term health.
Table of Contents
- CGM 101: Sensors, Readers/Apps, and Warm-Up Periods
- Accuracy Basics: MARD, Lag Time, and When to Finger-Stick
- Setting Up: Placement, Calibration Rules, and Alerts
- Reading the Data: Time-in-Range, GMI, and Variability
- Who CGM Helps (and Who It Doesn’t) Outside Diabetes Care
- Common Pitfalls: Compression Lows, Hydration, and Exercise Artifacts
- Privacy, Data Export, and Working with a Clinician
CGM 101: Sensors, Readers/Apps, and Warm-Up Periods
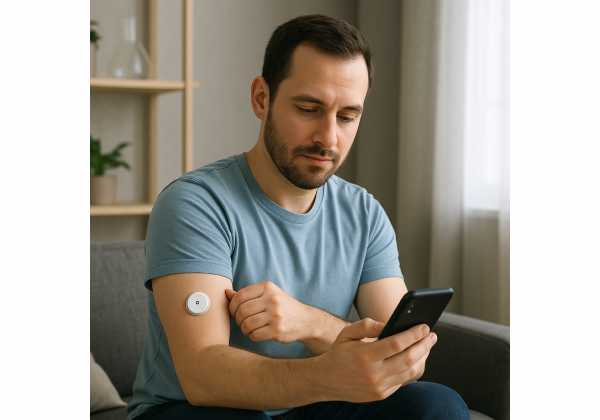
A CGM is a small sensor that sits just under the skin and samples interstitial glucose every few minutes. It transmits readings to a phone app or dedicated reader, which graphs trends, sets alerts, and compiles reports. Most modern systems are “factory-calibrated,” meaning you can start them without finger-stick calibration. Others still allow or require periodic calibration. Either way, the core promise is the same: frequent measurements that reveal patterns missed by occasional meter checks or quarterly labs.
It helps to understand the basic components:
- Sensor: A filament that interacts with interstitial fluid to estimate glucose. Typical wear time ranges from 10 to 14 days for disposable sensors and up to several months for implantables.
- Transmitter: Sends data from the sensor to your phone/reader. Some systems embed this into a disposable sensor; others are reusable.
- App/Reader: Displays current glucose, rate-of-change arrows, alerts, daily overlays, and longer reports such as the Ambulatory Glucose Profile (AGP).
- Cloud platform (optional): Stores data for long-term review and sharing with a clinician or coach.
Two realities matter for day-to-day use. First, interstitial glucose lags behind blood glucose during rapid changes, especially around exercise or meals. Second, sensors need a warm-up period—commonly 30–60 minutes, sometimes longer—before showing data. During warm-up, don’t expect readings or alarms. Plan your insertions so warm-up doesn’t coincide with a workout, a commute, or sleep onset, when having alerts would be most helpful.
For longevity-focused users, CGM is not about “diagnosing diabetes.” Instead, it’s about learning how your routine drives excursions. A few examples:
- A late, high-carb dinner pushes a glucose peak into sleep, which can fragment rest.
- A protein-forward lunch with a short walk produces a modest rise and faster return to baseline.
- High-intensity intervals can transiently raise glucose, while long easy efforts may nudge it lower.
Because sensors are worn on the arm, abdomen, or thigh, site selection matters. You want a location that’s:
- Comfortable under clothing and seat belts,
- Away from belts and waistbands that shear the adhesive,
- Reasonably protected from direct pressure while you sleep.
Finally, CGM works best when combined with a simple diary. You don’t need to log every bite forever. A two-week snapshot that marks meals, workouts, alcohol, and bedtime is often enough to connect causes with effects.
Accuracy Basics: MARD, Lag Time, and When to Finger-Stick
How accurate is “accurate enough”? The headline metric is MARD (mean absolute relative difference), a percentage summarizing how far CGM readings deviate from a lab reference. Contemporary systems often report overall MARD values near the high single digits under typical conditions. Accuracy is best in the mid-range, and worse at very low glucose, which is exactly where alarms must work. That’s why context—how fast glucose is moving, and whether a reading matches your symptoms—matters more than any single number.
Three practical principles will keep you safe and confident:
- Respect lag time. CGM measures interstitial glucose, which trails blood glucose—often by 5–10 minutes—during fast transitions. Expect temporary disagreement right after a big meal, at the start of intense exercise, or when treating a low. Rate-of-change arrows help: if you’re dropping at 2–3 mg/dL per minute, the current value is already “behind.”
- Know when to confirm. Use a finger-stick when:
- You feel symptoms that don’t match the CGM number (dizziness with a “normal” reading, or no symptoms during a supposed low),
- The app shows a compression low (flat low without typical preceding drop) and you’re lying on the sensor,
- You’re about to make a high-stakes decision and readings are changing quickly (e.g., treating a suspected low during a long drive).
- Check signal quality. Warm-up, lost signal, or adhesive lift can cause gaps. If your report shows <70% data capture over 14 days, your summary metrics (e.g., time-in-range) become less reliable.
A few more terms you’ll see:
- Error grids (Clarke or Surveillance): Classify how clinically meaningful a discrepancy is. A small error near target is less concerning than a big miss in hypoglycemia.
- % within ±15/15: Share of CGM readings within ±15 mg/dL (when reference <100) or ±15% (when reference ≥100). Higher is better.
- %CV (coefficient of variation): A variability measure; a common target is <36% in diabetes care, useful as a general yardstick for stability.
For users tracking longevity, CGM complements periodic labs by showing daily patterns that influence A1c and fasting glucose over time. If you want a refresher on those core markers, see A1c and fasting insulin in our biomarker series.
Bottom line: trust trends more than isolated points. When in doubt, confirm with a finger-stick—especially if you have symptoms, you’re driving, or readings seem out of character.
Setting Up: Placement, Calibration Rules, and Alerts
A smooth setup pays dividends for comfort and data quality. Think of insertion day as a short checklist.
1) Choose the site wisely.
Arms (posterolateral), abdomen (away from beltline), and upper buttocks are common. Aim for:
- Subcutaneous fat over muscle (too superficial placement can irritate; too deep can hurt and impair readings),
- Low shear zones that won’t catch on waistbands or backpack straps,
- Sleep position compatibility—avoid the side you usually lie on to reduce compression lows.
2) Prep the skin.
Wash with soap and water, dry thoroughly, and consider an alcohol swab after drying (let it evaporate fully). If you’re prone to irritation, a thin hydrocolloid patch beneath the adhesive (with a hole cut for the filament) can help. Press the adhesive firmly for 30–60 seconds to improve bond. If swimming or heavy sweating is planned, add an overpatch after 12–24 hours.
3) Time the warm-up.
Start the sensor when you can watch the first few hours, not right before bed. During warm-up you won’t get alerts; plan meals and exercise accordingly. If your device supports code scanning or transmitter pairing, complete those steps before insertion to avoid redoing work.
4) Calibration rules.
Most factory-calibrated sensors don’t require finger-stick calibration. If your model allows it and you choose to calibrate, do so when:
- Glucose is stable (no arrows) and it’s been 2–3 hours since eating or exercising,
- Hands are clean (wash and dry), and the meter is within its control range.
Avoid calibrating during rapid rises or falls; you’ll “teach” the sensor a moving target.
5) Alerts that serve you.
Set low and high thresholds you’ll act on. For longevity-focused users (not dosing insulin), aggressive alerts can cause alert fatigue. Consider:
- Low alert high enough to catch true lows but not every gentle drift (e.g., 70–75 mg/dL),
- High alert that flags distinct patterns you want to change (e.g., late-evening spikes after large dinners),
- Rate-of-change alerts during times you can intervene (pre-drive, pre-workout), while muting them during meetings or sleep.
6) Create a lightweight diary.
For two typical weeks, log only the catalysts: meal start, meal type, exercise start/stop, alcohol, bedtime, wake time. You’ll align those stamps with the CGM trace later.
If sleep is a priority, pairing CGM with a wearable can surface timing issues (e.g., sugar peaks after bedtime). A brief primer on choosing and interpreting trackers is here: sleep wearable data.
7) Plan removal and rotation.
Rotate sites to reduce irritation and maintain accuracy. If you see redness beyond the adhesive border, give that area 2–3 weeks before reusing.
Reading the Data: Time-in-Range, GMI, and Variability
Once you’ve collected ≥14 days with ≥70% wear time, it’s time to interpret the report. Nearly all platforms generate an Ambulatory Glucose Profile (AGP): a one-page summary with daily overlays, time-in-range bars, and key metrics.
Core metrics and how to use them
- Time-in-Range (TIR): Percentage of readings in your chosen target band. In diabetes care, the standard band is 70–180 mg/dL. For longevity experiments, many people review both 70–140 mg/dL (meal quality) and 70–180 mg/dL (broader stability). Use the stricter band for pattern-finding, and the standard band for consistency.
- Time-Above-Range (TAR) and Time-Below-Range (TBR): Helpful to quantify late-evening peaks and nocturnal dips. If TBR rises during long endurance sessions or after alcohol, you’ve found leverage points.
- GMI (Glucose Management Indicator): An estimate of A1c derived from mean CGM glucose. Treat it as a directional pointer, not a lab replacement—anemia, red-blood-cell lifespan, and device mix can create gaps between GMI and measured A1c.
- Mean glucose and %CV: Average level and variability. A %CV below ~36% suggests fewer big swings; lower is generally calmer, provided TBR stays reasonable.
How to read the AGP like a pro
- Start with coverage (days worn, % active). If coverage is thin, postpone changes and collect another week.
- Scan the median line on the AGP (the dark curve): Look for consistent rises after breakfast or dinner, mid-afternoon dips, or overnight drift.
- Check the interquartile band (the darker shaded area): Wide bands hint at variable behavior—often inconsistent meal timing, big weekend vs weekday shifts, or erratic snacking.
- Review the daily overlay: Do the same peaks recur at the same clock time? That’s your highest-yield habit to adjust.
Turning metrics into action
- If TAR is concentrated after dinner: bring the meal earlier, add protein/fiber, take a 10–20 minute post-meal walk, or trim ultra-processed carbs.
- If TBR increases overnight: review alcohol timing, bedtime snacks, and exercise intensity near sleep.
- If %CV is high with normal mean: target regularity—meal timing, sleep, and hydration—before chasing macronutrient minutiae.
If you’re deciding whether a formal challenge makes sense, see our overview of glucose challenge tests. A brief OGTT or mixed-meal test can complement CGM by stressing the system under controlled conditions.
Who CGM Helps (and Who It Doesn’t) Outside Diabetes Care
CGM originated for people with diabetes, yet its behavior-mapping power can help many others—provided expectations are realistic.
Often helpful
- Individuals with strong family history of type 2 diabetes or gestational diabetes: Early pattern awareness can shape meal timing, weight management, and activity habits before lab abnormalities appear.
- People with reactive hypoglycemia–like symptoms (shakiness, fatigue after carb-heavy lunches): CGM can confirm or refute true lows and guide meal composition.
- Endurance athletes: Long trainings, heat, and altitude can shift glucose handling. CGM helps refine fueling, especially when stacking sessions across days.
- Shift workers: Irregular schedules alter meal timing and sleep—two of the biggest drivers of glycemic variability.
- People targeting fatty liver risk: Evening hyperglycemia patterns often coincide with late-night snacking and poor sleep. Pair CGM insights with NAFLD screening when appropriate.
Sometimes helpful
- Weight-loss plateaus: When calorie tracking stalls, CGM may flag ultra-processed snacks or “liquid carbs” that feel small but create long TAR tails. Use it for two to four weeks to re-tune habits, then remove the device to reduce friction.
- Perimenopause/menopause transitions: Hormonal changes can alter insulin sensitivity and sleep; CGM can inform evening nutrition and training intensity.
Less helpful or not indicated
- People with high health anxiety: For some, constant numbers amplify stress without improving behavior. In that case, a short, coached trial or a retrospective (blinded) CGM is better than always-on monitoring.
- If you’ll never change behavior based on data: CGM becomes expensive noise. Consider low-burden alternatives (e.g., a short post-meal walk rule).
- Those with skin/adhesive sensitivities that persist despite patches and rotation.
Remember, CGM is a learning tool, not a moral scorecard. The goal is to find two or three high-yield adjustments you can sustain: earlier dinners, a habit of walking after starch-heavy meals, or reserving sweets for days with higher activity.
Common Pitfalls: Compression Lows, Hydration, and Exercise Artifacts
Even accurate sensors can be tripped up by real-world quirks. Here are the most common traps and how to sidestep them.
Compression lows
Lying on the sensor (e.g., side sleeping) can restrict local blood flow and falsely lower readings, often to the 50s or 60s without symptoms. Clues include:
- A sudden flat low without the usual descending slope,
- Recovery the moment you roll off the site,
- Annoyingly timed low alarms at night.
Fixes: Place sensors away from your preferred sleep side. If it happens, sit up, wait a few minutes, and confirm with a finger-stick before treating.
Hydration and heat
Dehydration can concentrate interstitial fluid and worsen variability. Likewise, hot tubs and saunas increase local perfusion and may destabilize readings. Drink water regularly and allow ~30 minutes after intense heat before making decisions from CGM values.
Exercise artifacts
- High-intensity intervals can induce temporary spikes from counterregulatory hormones. Expect a quick rise and slow normalization.
- Long, easy efforts often produce gentle lows. If you feel fine and the drop is slow, small fuel adjustments (e.g., 10–15 g carbohydrate) may be all you need.
- Contact or water sports challenge adhesives. Use overpatches and consider inserting 24 hours before the event so the adhesive fully cures.
Acetaminophen and supplements
Some sensors historically showed interference from acetaminophen (paracetamol). Check your device’s guidance. When in doubt, confirm with a meter after dosing.
Adhesive and skin
Rotate sites. If you develop irritation, switch to barrier films or hydrocolloid underlays (with a cutout for the filament). Remove adhesive gently with an oil-based remover to protect skin.
Data gaps and app glitches
If your 14-day report shows low data capture, recheck Bluetooth permissions, background app refresh, and whether the phone ever leaves the sensor’s range (e.g., a gym bag on the sideline). For workouts, a small arm band to keep the phone near the sensor can improve capture.
Want to correlate dips and spikes with effort or recovery load? Pair CGM snapshots with basic biometrics discussed in heart rate and HRV tracking.
Key habit: When any reading looks odd, ask: Did I just eat, move, take a hot shower, lie on the sensor, or log a new medication? If yes, retest in 10–15 minutes or confirm with a finger-stick before acting.
Privacy, Data Export, and Working with a Clinician
CGM creates a detailed picture of your day. Treat it like any sensitive health stream: decide who sees what, how long data are stored, and where you’ll review them.
Smart sharing
- Share data with one trusted clinician or coach who understands CGM reports and your goals. More viewers can mean more messages without better decisions.
- If you’re experimenting (e.g., two-week blocks), tell your clinician what you’ll test—meal timing, post-meal walks, or alcohol rules—and what success looks like (e.g., evening TAR cut in half, fewer nocturnal dips).
Exporting data
Most platforms allow exporting CSV or PDF. PDFs are clean for snapshots and clinical visits; CSVs are useful if you want to chart glucose against steps, heart rate, or sleep duration. If you experiment often, keep a simple folder structure by date and theme (e.g., “2025-09 two-week evening walk trial”). Keep annotations brief but consistent: “Meal start,” “Bedtime,” “Beer x1,” “Zone 2 ride.”
Consent and retention
If you connect to third-party apps, review what they store and for how long. Disable auto-sharing you don’t use. If your platform offers read-only links for clinicians, prefer those over broader cloud syncing.
Preparing for a visit
Bring one AGP page plus three bullets:
- One pattern you want to fix (e.g., 8–10 p.m. spikes),
- One behavior you’re willing to try for two weeks,
- One safeguard (e.g., confirm lows before treating).
Medical context still matters
CGM doesn’t replace labs or clinical evaluation. If your GMI diverges from measured A1c, discuss anemia, kidney issues, red-blood-cell turnover, or medications that might explain the gap. And if you experience frequent symptoms suggestive of hypoglycemia or hyperglycemia, seek medical assessment regardless of CGM numbers.
When to pause CGM
If the device increases stress or you’re no longer acting on insights, take a break. Revisit it for targeted experiments, like training blocks or diet shifts, rather than running indefinitely.
References
- 7. Diabetes Technology: Standards of Care in Diabetes-2025 2025 (Guideline)
- Evaluating the precision and reliability of real-time continuous glucose monitoring systems in ambulatory settings: a systematic review 2024 (Systematic Review)
- Continuous glucose monitoring and metrics for clinical trials: an international consensus statement 2023 (Consensus Statement)
- Clinical targets for continuous glucose monitoring data interpretation: recommendations from the International Consensus on time in range 2019 (Consensus Statement)
- Monitoring Technologies- Continuous Glucose Monitoring, Mobile Technology, Biomarkers of Glycemic Control – Endotext – NCBI Bookshelf 2023 (Reference Chapter)
Disclaimer
This article is for educational purposes and is not a substitute for professional medical advice, diagnosis, or treatment. Always discuss CGM setup, targets, and any concerning symptoms with a qualified clinician who knows your medical history. Do not ignore or delay seeking professional advice because of information here.
If you found this helpful, please consider sharing it on your favorite platform (Facebook, X, or anywhere you connect with others) and follow us for future updates. Your support helps us keep producing practical, evidence-informed guides.


